I have to admit it . When I saw this post (thank you haken en meer !) and this one (thank you Jeanette!), well, I thought "why not?"....
So, that's why I started to crochet mini hexagons with the join as you go method.....just for curiosity (I decided for a different pattern) and to improve my crochet skills (the join as you go method.....still a little bit unusual, but I'm there! Yay!).....
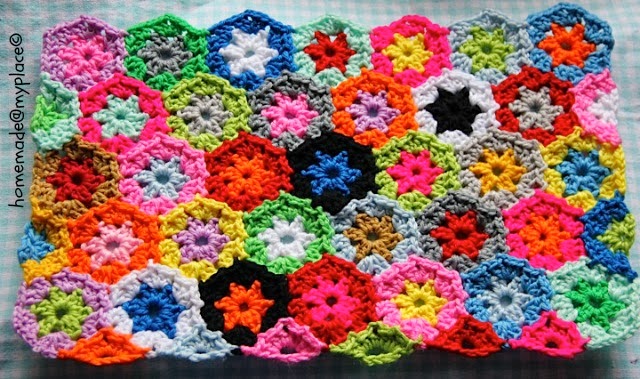
This is the result, when I completed the crocheting....

.... a rectangle with some pointy edges!!!! So colourful that I smile each time I look at it!


I made 33 hexagons, working with a 5mm hook and indonesian acrylic yarn.
I just followed the first 2 rounds of the african flower crochet pattern found at Yvestown !
On both sides, I had to fill the gaps with a total of 4 half hexagons (pattern found here, just needed the first 2 rows/semi rounds), as you can see.....


....and look at the base...

.... I needed to fill other gaps ( 6), with a different pattern (made by me!!!!!) of 1/3 hexagons....

To make this 1/3 hexagons (remember I'm using the join as you go method!), I did in this way :
make a slip knot and chain 8, then join with a slip stitch to form a ring.
chain 1 and join your ring with a slip stitch to the point of the hexagons on your right.
make 2 DCs (double crochets, US crochet terminology!) into the ring.
make 1 slip stitch in the first space of the hexagon.
make other 2 DCs into the ring.
make a slip stitch in the corner of the hexagon
make another slip stitch, but this time in the hexagon on the left!
make 2 DCs into the ring.
make a slip stitch in the space of the hexagon.
chain 1 and slip stitch in the point of the hexagon.
fasten off!!! DONE!!!!
Hope I've made myself quite understandable! If there is any problem/question, please contact me using the comment box at the end of this post or via email !!! Thank you!!!!


... Then, I folded my fabric in two... this is the FRONT of the sleeve....

....and this is the BACK....

...but honestly, I think the back can be the front and that the front can be the back!!!!! ;oD
I've started to join the sides of the sleeve beginning from the bottom and using SINGLE CROCHET stitches...


...then I reached the corner...


...so, little by little, I completed the long side of the sleeve, too....


....and I began to crochet SCs in the top front of the cover...


.... I didn't forget the top back !!!!.....

..... Fasten off, trim all the ends and the IPad sleeve is DONE !!!!


....maybe it's better to check if the size is right, don't you think ???
Ok....

...is it inside or not???

Have a closer look, please....


Good!!!!
....I've added a last colourful touch.....


....I think this is not over embellished, but just really me!!! Love the TASSELS!!!
You can make some following this photo tutorial !!!! Have fun !!!!
xxxx Alessandra
today link : Creative Friday !!! See you there, too!!!
So, that's why I started to crochet mini hexagons with the join as you go method.....just for curiosity (I decided for a different pattern) and to improve my crochet skills (the join as you go method.....still a little bit unusual, but I'm there! Yay!).....
This is the result, when I completed the crocheting....
.... a rectangle with some pointy edges!!!! So colourful that I smile each time I look at it!


I made 33 hexagons, working with a 5mm hook and indonesian acrylic yarn.
I just followed the first 2 rounds of the african flower crochet pattern found at Yvestown !
On both sides, I had to fill the gaps with a total of 4 half hexagons (pattern found here, just needed the first 2 rows/semi rounds), as you can see.....


....and look at the base...

.... I needed to fill other gaps ( 6), with a different pattern (made by me!!!!!) of 1/3 hexagons....

To make this 1/3 hexagons (remember I'm using the join as you go method!), I did in this way :
make a slip knot and chain 8, then join with a slip stitch to form a ring.
chain 1 and join your ring with a slip stitch to the point of the hexagons on your right.
make 2 DCs (double crochets, US crochet terminology!) into the ring.
make 1 slip stitch in the first space of the hexagon.
make other 2 DCs into the ring.
make a slip stitch in the corner of the hexagon
make another slip stitch, but this time in the hexagon on the left!
make 2 DCs into the ring.
make a slip stitch in the space of the hexagon.
chain 1 and slip stitch in the point of the hexagon.
fasten off!!! DONE!!!!
Hope I've made myself quite understandable! If there is any problem/question, please contact me using the comment box at the end of this post or via email !!! Thank you!!!!


... Then, I folded my fabric in two... this is the FRONT of the sleeve....

....and this is the BACK....

...but honestly, I think the back can be the front and that the front can be the back!!!!! ;oD
I've started to join the sides of the sleeve beginning from the bottom and using SINGLE CROCHET stitches...


...then I reached the corner...


...so, little by little, I completed the long side of the sleeve, too....


....and I began to crochet SCs in the top front of the cover...


.... I didn't forget the top back !!!!.....

..... Fasten off, trim all the ends and the IPad sleeve is DONE !!!!


....maybe it's better to check if the size is right, don't you think ???
Ok....

...is it inside or not???

Have a closer look, please....


Good!!!!
....I've added a last colourful touch.....


....I think this is not over embellished, but just really me!!! Love the TASSELS!!!
You can make some following this photo tutorial !!!! Have fun !!!!
xxxx Alessandra
today link : Creative Friday !!! See you there, too!!!
It looks wonderful ... much better than my grey plastic one! M x
ReplyDeleteIt looks great! :)
ReplyDeleteIt's super, marvellous, beautiful, gorgeous! My list of things is growing.....rapidly! :) x
ReplyDeleteWow, what a great sleeve. The colors are so beautiful. I've read your post with a smile on my face. It gives me a little energy looking at it. Love Tinie
ReplyDeleteCiao, Ale
ReplyDeleteSei davvero bravissima e creativissima, Cara :0) A me piace tanto la tua camicia per IPad
Baci
Nata
That is sooooo cute ! And so much better than those plastic ones...(that we have ;-).... maybe not for long now!) By the way, I saw an item about Jakarta on the news yesterday... About the rising water and the "sinking" city! Lots of Dutch engineers are working there now it seems, to make dams and things like that.... Strange idea that that's happening, don't you think? Love from Mirjam.
ReplyDeleteit's gorgeous, I would love this!! Heather x
ReplyDeleteWhat a cute work! I love these colorful hexagons :)
ReplyDeleteGreetings,
Hanni
P.s. my husband has the same smart case and it is not easy to find a sleeve which fits to this size. Most standard sleeves are too tight. So your crochet sleeve is a really smart idea ;)
So cute, really! colorful! yes!
ReplyDeleteKisses and a big hig!
A very nice and colorful crochet! I love the tassels! :-)
ReplyDeleteThis soooooooooo gorgeous Alessandra!! I actually said 'Ooooooooh' out loud when I saw it, haha :) :) Pure genius,and, yes - very you!
ReplyDeleteAlison xx
Great job!! Love the colors and your adorable little hexagons!!
ReplyDeleteKate :}
On Pinterest there is one picture to see, but here on you blog the photos are way better. Such an happy sleeve, well done Ale:)!
ReplyDeleteBright, colorful and fun! Absolutely love it. I wish my brain worked like yours. Very, very creative. Best wishes, Tammy
ReplyDeleteSo cute, I love the hexagons :)
ReplyDeleteHi Alessandra!
ReplyDeleteI always love the combination of the good old fashioned craft that is crochet with today's hightech gadgets! :) Oh, and I love the colors and tassels, too!
Thanks for sharing your project at The Crochet Boulevard, and also thanks for the comments you leave on my main blog, I really appreciate that!
Have a great week-end,
Barbara